|
  Be Here
Portal 1 panoramic lens 05/22/98 Be Here
Portal 1 panoramic lens 05/22/98
by Michael D.
Murie
A
panoramic lens that takes a 360 degree image in a
single picture
Pros:
Takes a
panorama in a single image; saves time in
photographing and stitching scenes, and costs in
developing. Attention getting.
Cons: Initially
expensive. No way of seeing what the final panorama
will look like. Lower resolution than possible with
stitching solutions. Lighting may be more difficult
to correct in difficult situations. Attention
getting.
While
reviewing
Immersive Imaging software for
New
Media I was
fortunate enough to get a loan of the
Be
Here Portal
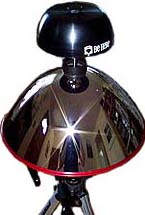
1 lens. This
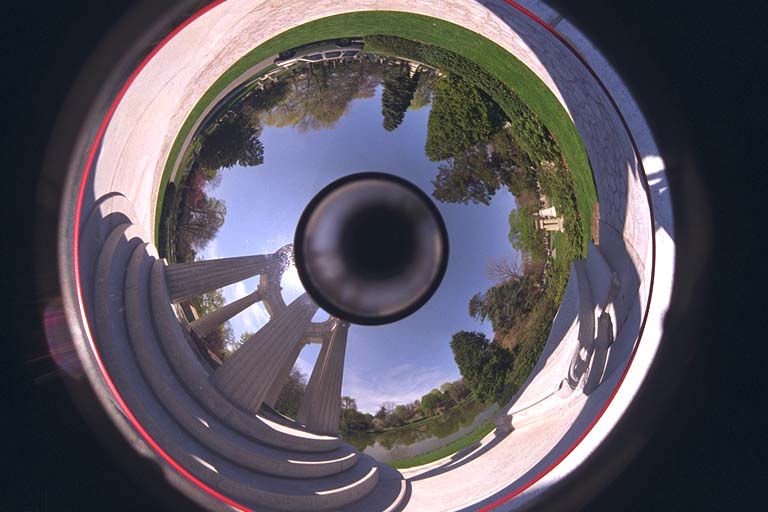
lens is primarily a parabolic mirror that takes a
single image that covers 360 degrees (around) and
has an FOV of 100 degrees vertically (equivalent to
a 15 mm lens.) The image captured on film resembles
a donut, and must be run through their special
software which takes the image and flattens it out
to create a panoramic image. The following short
article covers my experiences with this lens. The
lens uses the standard Nikon bayonet mount.
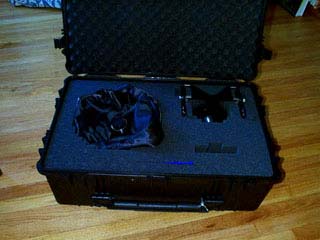
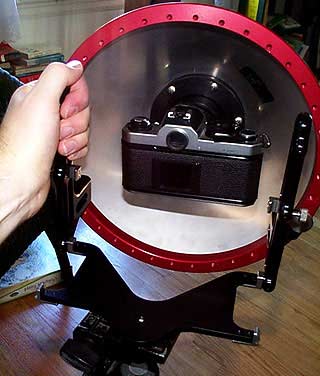
The
lens arrived in a large, heavy, black plastic box
that looked like it contained a missile launcher.
Opening it up revealed that the lens comes in three
parts; the parabolic mirror, the top reflector, and
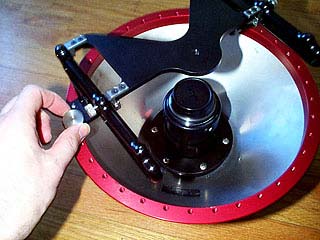
the lens base. Assembling the lens is best done in
the field because you don't want to transport the
lens unprotected. The parabolic lens is first
rested upside down on a small plastic cap on it's
top while you screw the base into the lens. Then
you turn the lens over, pull off the plastic cap
and attach the top reflector to the lens. The
camera is then attached to lens. It's probably best
to attach the lens base to a tripod before doing
this. The lens base actually releases to swing the
lens 90 degrees to the right, making it much easier
to attach the lens (though you want to be careful
while doing this, even on a solid tripod the weight
of the lens can make this a slightly dangerous
proposition.)
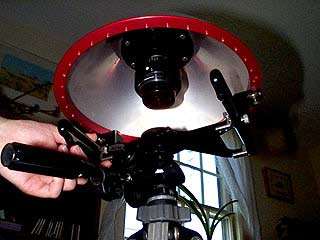
The
lens is heavier than most lens/camera combinations
(it's about 10 lb.), but I found it luggable. My
tripod is fairly light and I had no trouble walking
about with the two; if your tripod is heavy, you
might find the combination too much for long
distances.
Assembly and
disassembly actually proved to be very easy; but
the cost of the lens did give me some pause when
nervously assembling it the first time, and even
after a few days I remained a little nervous when
working with it. I considered trying to take a
panorama inside a car as a test, but in the end
decided that it would require some serious rigging
work for me to feel safe about setting the camera
up in a vehicle, putting the camera on self timer,
and getting out before the picture was taken! I
also considered shooting a test at the same time
using a regular lens and stitching software to
compare results. Lack of time and resources nixed
that idea.
Once
the camera is attached it's time to shoot your
panoramas. The "lens" has an adjustable f/stop
setting, though Be Here recommends using f 22,
which is what I did. The camera I used was a manual
Nikon FM2 camera. For exposures I took light
readings using a second camera and a gray
card!
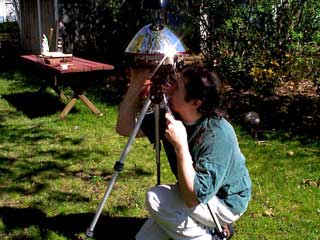
In
use, all you have to do is set the tripod up, level
the lens (there's no level indicator on the lens
itself) and either hide under the lens while taking
the picture or use a timer. For external shots I
crouched under the tripod and only had a couple of
pictures were I could see a bit of my head because
I didn't get down far enough.
For
outdoor shoots I set the lens on a tripod at about
5 feet. However, I found that for indoor use, I
really needed to drop the lens down to about 3 feet
because the lens captured too little floor and too
much ceiling.
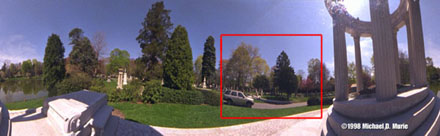
Sample
processed panorama. Click to see enlargement of
part of the image.
The
real joy of this lens is the speed with which you
can take multiple panoramas in rapid succession. I
took about 30 pictures of a park in under an hour;
literally I would walk, set up the tripod, click,
and set off again. The lens attracted a lot of
attention; New Beetle and prospective iMac owners
will find this lens appealing. I heard one person
speculate that the lens was used for surveying! The
lens would also make it possible to create animated
panoramas; though there is currently no software
that I know of that supports such a feature.
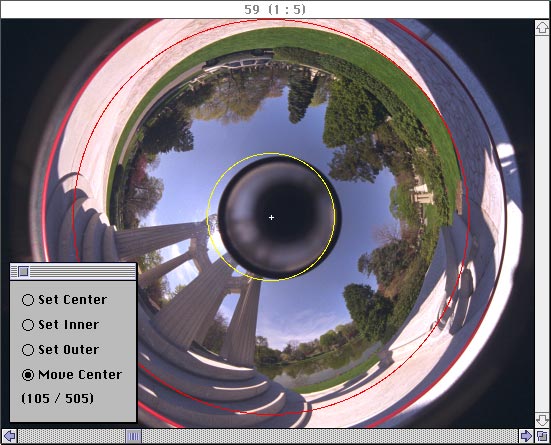
The
pictures I took were developed to PhotoCD and I
used the largest resolution to create the final
panoramas. The software application provided
(there's both a Mac and Windows version, I used the
Mac one) is very simple. It let's you manually find
the center of the image and then adjust the inner
and outer area of the image (see screen
shot) by
clicking.The Decode function then creates a
panoramic image. This image can be saved in either
BMP or TIFF format. Though the program imports PICT
files, it will not import PICT files saved with JPG
compression. The program also needs at least 32MB
free space minimum. The company will be releasing a
new version written in Java sometime in the near
future.
The
results, though not as sharp or detailed as
panoramas created using a fixed lens camera and
multiple images, I'd judge acceptable for QuickTime
VR and related technologies. A sample panorama is
included below. This picture was sharpened and the
color adjusted before creating the final QuickTime
VR file.
I
was particularly glad that I had a couple of days
to test the lens and get an idea of the best height
to use the lens. The biggest disadvantage, I think,
is that you don't really know what the lens is
seeing until you get your final pictures back. All
of the pictures I took were usable, but sometimes
they weren't exactly how I might have framed them
had I been able to look through a viewfinder and
visualize the final image. Exposure was nearly
always fine; even when the sun was shining directly
on the lens. Panoramic and fisheye lens solutions
have an advantage that they reduce the number of
pictures that you have to take. However, if you are
shooting in doors in a poorly lit room lighting
with a panoramic lens poses unique challenges (but
so does shooting multiple pictures with a
wide-angle lens, the wide angle just gives you more
opportunities to light parts of your scene.)
If
you need to take lots of panoramas then this lens
will pay for itself both in time and developing
costs. For developing alone, if you take panoramas
and develop them to PhotoCD and it costs $1.20 an
image then using the Portal 1 vs. a 15 mm lens (and
12 shots per panorama) the lens would pay for
itself after 750 scenes.
Be
Here's website says that they are evaluating
whether to offer support for a medium format
camera, and there is also talk of a digital
solution. Based on my experience with digital
cameras, only one of the more expensive cameras
will provide anything approaching acceptable
resolution, and I wonder whether exposure latitude
will be a problem. I think I'd stick with a film
camera.
|
|
(Cinepac 75)
from a 2496 x 768 file
(343K
file)
opens in a separate
window
Requires QuickTime 3

|
(Cinepac 75)
from a 1248 x 384 file
(125K
file)
opens in a separate
window
Requires QuickTime
3
|
Example movie
created using original size file, and a half size
file both were compressed using QTVR Authoring
Studio using standard settings,
|